Plumbing problems happen in every home, and they often seem to strike at the worst times. While calling a plumber is sometimes necessary, knowing a few quick fixes can save you from costly repairs and major headaches. From unclogging drains to stopping leaks, these simple yet effective DIY solutions can make a big difference. With just a few basic tools and materials, you’ll feel more confident handling minor issues before they grow into expensive problems.
Tools Every Homeowner Should Have for Plumbing Repairs
Owning the right plumbing tools can save you from a lot of stress and money. While you might not plan to take on large-scale plumbing projects, having a go-to set of tools for common fixes is essential. Below, we’ll highlight the must-have items every homeowner should keep handy for quick and effective plumbing repairs.
Plunger: Your First Line of Defense
A plunger is the most basic yet one of the most effective plumbing tools. Keep two types on hand:
- Cup plunger: Designed for flat surfaces like sinks and tubs.
- Flange plunger: Perfectly shaped for unclogging toilets.
You might be surprised by how often this simple tool can save you from bigger issues, like hiring a professional for a clogged drain.

Photo by Anıl Karakaya
Adjustable Wrenches and Pipe Wrenches
Every homeowner needs at least a basic adjustable wrench. This tool is versatile and can handle different-sized nuts and bolts. For pipe-related tasks, pipe wrenches are ideal for gripping larger fittings and loosening or tightening pipes.
- Pro Tip: Use one pipe wrench to hold a pipe steady while using the second to twist.
Plumber’s Tape (Teflon Tape)
Leaks often form at joints and pipe connections, but Teflon tape can help. This thin, thread-sealing tape is wrapped around pipe threads to create a watertight seal. It’s inexpensive and takes up no space, yet it can be a lifesaver.
Basin Wrench for Tight Spots
A basin wrench is specifically designed to work in cramped spaces under sinks. Its T-shaped handle and pivoting jaws allow you to tighten or loosen hard-to-reach nuts on faucets and other fixtures.
Drain Snake or Hand Auger
For stubborn clogs that a plunger can’t fix, a drain snake or hand auger is your go-to tool. It helps you dislodge clogs deeper down the drainpipe without resorting to harsh chemicals that could damage your plumbing.
Tubing Cutter or Hacksaw
If you need to cut pipes—whether they’re plastic, copper, or metal—a tubing cutter provides a cleaner, more precise cut than a hacksaw. However, having both tools ensures you’re prepared for thicker or irregular pipes.
Plumber’s Putty and Epoxy
For sealing leaks or mounting sink fixtures, plumber’s putty is essential. If you encounter cracks or holes in pipes, epoxy putty can temporarily block leaks until a permanent repair can be made.
Personal Protective Equipment (PPE)
Even small plumbing jobs can get messy or risky. Equip yourself with gloves and safety goggles to protect against water, chemicals, or flying debris. No one wants an unexpected splash in the face when you’re loosening an old pipe!
Caulk Gun and Silicon Caulk
Fixing a leaky faucet seal or resealing a tub? A caulk gun paired with waterproof silicon caulk allows you to create a long-lasting, watertight barrier around fixtures and seals.
By keeping these tools readily available, you’ll handle those unexpected plumbing headaches with confidence.
Fixing a Leaky Faucet
A leaky faucet isn’t just annoying—it’s also costly. Dripping water can waste up to 10,000 gallons a year in a single household, which shows why it’s important to address the problem quickly. Fortunately, repairing a faucet doesn’t require a professional plumber in many cases. With a bit of know-how and basic tools, you can nip this issue in the bud. Let’s tackle this step by step, from diagnosing the cause to fixing the most common culprits.
Common Causes of a Leaky Faucet
Understanding why faucets leak is the first step to fixing the problem. Here are the typical sources:
- Worn-Out Washers: These flat rubber components create a seal inside the faucet. Over time, they deteriorate due to friction against the valve seat.
- Damaged O-Rings: Found in cartridge faucets, O-rings are essential for creating a watertight seal. A damaged or loosened O-ring will often cause leaks near the base of the faucet.
- Faulty Cartridges: Different from compression-style faucets, cartridge faucets rely on a movable cartridge to control water flow. A damaged cartridge can result in persistent drips.
- Valve Seat Corrosion: This is where the faucet and spout connect. Hard water deposits or corrosion can lead to leaks around the spout base.
- High Water Pressure: Excessive pressure might cause water to trickle from a faucet even when it’s off.
Step-by-Step Guide to Fixing a Leaky Faucet
Once you’ve identified the issue, follow these steps to tackle the repair:
1. Gather Your Tools and Supplies
Before diving in, make sure you have these items handy:
- Adjustable wrench
- Screwdrivers (flathead and Phillips)
- Replacement parts: washers, O-rings, or cartridges (specific to your faucet type)
- Plumber’s grease
- Needle-nose pliers
- Vinegar (for cleaning corrosion)
2. Shut Off the Water Supply
Locate the water shutoff valves under the sink, and turn them off completely. Turn on the faucet to release any water left in the lines.
3. Disassemble the Faucet
- Remove the faucet handle. If it’s secured with screws, use a screwdriver to loosen them. For some models, you may need an Allen wrench.
- Once the handle is removed, you’ll see a nut, which may require an adjustable wrench to unscrew.
4. Inspect Components
- Look for worn, cracked, or corroded parts. Pay special attention to the following:
- Washers: If they appear flattened or frayed, replace them.
- O-Rings: Check for cracks or looseness.
- Cartridge: Pull it out and inspect if it’s cracked or damaged. Cartridges should sit snugly, not wobble.
5. Replace Faulty Components
- If replacing a washer, make sure the new washer matches the size of the old one.
- For O-rings, apply a small amount of plumber’s grease to the new ring to ensure a tight, frictionless fit.
- With cartridges, ensure you have the correct replacement model. Bring the worn cartridge to the hardware store if necessary.
6. Clean and Reassemble
- If you notice any corrosion on the valve seat, soak the area in vinegar and scrub with a brush.
- Reassemble the faucet in the reverse order of disassembly. Make sure all components are tightened securely, but avoid overtightening.
7. Test the Faucet
Turn the water supply back on and check for leaks while the water is running and once the faucet is turned off. If it still drips, double-check the installation of new components.

Photo by Ksenia Chernaya
Making these minor repairs can save you from costly water bills and potential damage caused by prolonged leaks. Once you’ve fixed one faucet, you’ll feel confident in handling others if they spring a leak.
Unclogging Drains and Toilets
When it comes to maintaining a functional home, clogged drains and toilets are among the most common issues you’ll face. While a professional plumber might seem like the only solution, there are plenty of effective DIY methods that can save you time and money. Let’s talk about ways to tackle these challenges head-on, whether it’s a greasy kitchen sink or an overworked toilet.
DIY Solutions for Kitchen Sink Clogs
Kitchen sinks often fall victim to grease and leftover food particles that clump together and block the drain. Luckily, a few household items and simple tools can make this problem easy to fix.
- Start with Boiling Water
Grease tends to solidify in pipes, creating stubborn clogs. Pour a kettle of boiling water slowly down the drain to melt and loosen the blockage. This should always be your first move. - Try Baking Soda and Vinegar
Equal parts baking soda and vinegar work wonders on kitchen drains. Pour 1 cup of baking soda down the drain, followed by 1 cup of vinegar. Cover the drain and wait 20-30 minutes before flushing with hot water. This natural reaction breaks down grease and residue efficiently. - Use a Plunger
For tougher clogs, grab a cup plunger (not the toilet one!). Ensure the sink has some water to create suction, then apply firm, quick plunges. This can help dislodge food particles lodged in the trap. - Bring in a Drain Snake
If the blockage persists, use a drain snake or hand auger to break through deeper clogs. Insert it carefully and rotate to grab or loosen the debris. Pro Tip: Always avoid pouring grease directly down the sink to prevent future clogs. Instead, cool it in a container and dispose of it in the trash.
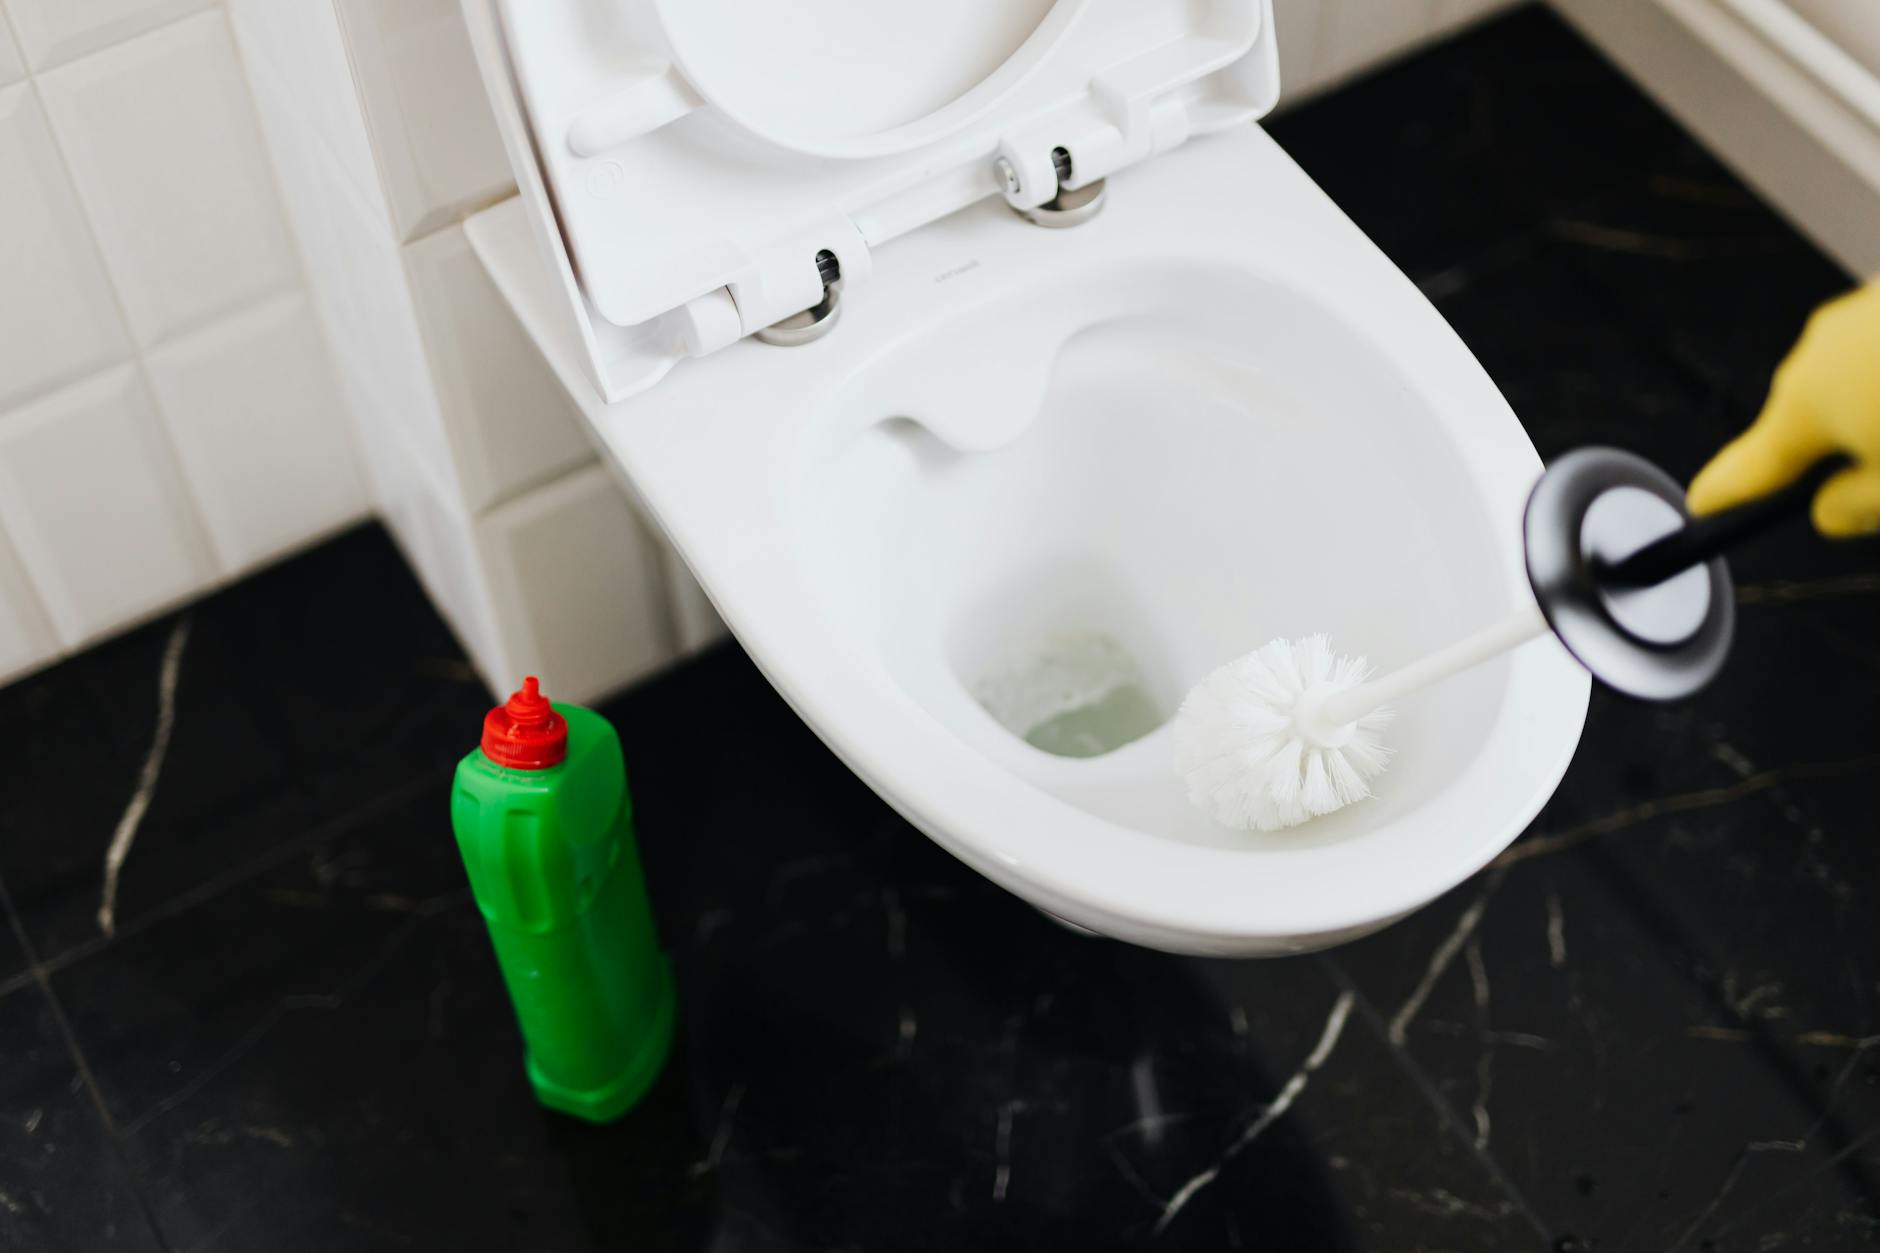
Photo by Kaboompics.com
Resolving Toilet Clogs
Few things are as panic-inducing as a clogged toilet. Fortunately, clearing one doesn’t require much experience—or even a plumber. With the right tools and know-how, most clogs are fixable within minutes.
The Power of a Plunger
A flange plunger is your go-to tool here. The rubber flap creates a tight seal inside the toilet drain, maximizing suction. Here’s how to use it effectively:
- Make sure there’s enough water in the bowl to cover the plunger.
- Place the plunger into the drain and press down gently to release trapped air.
- Plunge vigorously, using quick, sharp pushes to dislodge the clog. A few attempts should do the trick.
When to Use a Toilet Auger
If the plunger fails, a toilet auger—also called a closet auger—might be your best option. This specialized tool reaches deeper into the toilet trap.
- Insert the auger’s flexible metal cable into the bowl’s drain opening.
- Slowly crank the handle to move the cable through the clog.
- Once resistance is felt, rotate the handle firmly until the obstruction breaks or gets snagged. Pull it out carefully. Pro Tip: Unlike coat hangers, a toilet auger has a protective rubber sleeve to prevent scratching the toilet’s surface, making it not only effective but safe for your fixtures.
Avoid These Common Mistakes
- Don’t use harsh chemicals: Store-bought drain cleaners often corrode pipes and can create more damage in the long run.
- Stop flushing repeatedly: This might seem logical, but it often leads to overflow, turning an easy fix into a disaster.
- Don’t ignore warning signs: If you hear gurgling sounds or notice slow draining, act promptly before it worsens.
Handling toilet clogs the right way not only saves you from potential embarrassment but also keeps your plumbing system in good shape. While some cases might require a professional, understanding these basic solutions will help you manage most blockages with ease.
Stopping a Running Toilet
Dealing with a running toilet isn’t just annoying—it can waste hundreds of gallons of water per day and inflate your utility bill. Thankfully, fixing it is usually straightforward and doesn’t require a plumber. Here’s what you need to know and do when your toilet won’t quit running.
Common Causes of a Running Toilet
Running toilets often stem from one of a few components inside the tank. Identifying the problem is the first step toward fixing it:
- Worn-Out Flapper: The flapper is a rubber seal at the bottom of the tank that controls water flow into the bowl. If it doesn’t seal properly due to wear or dirt, water will continually flow.
- Faulty Fill Valve: The fill valve controls water entering the tank. A malfunctioning valve may never shut off, keeping the water running.
- Improperly Set Float: The float determines how much water enters the tank. If it’s set too high or too low, the tank could overflow or fail to fill properly.
- Overflow Tube Issues: If water rises above the overflow tube, it will keep draining into the bowl. This is usually caused by an improperly adjusted float or a defective valve.
How to Fix a Running Toilet
You don’t need special skills to solve this common issue—just a little patience and these steps:
1. Inspect the Flapper
The flapper is often the culprit behind a running toilet.
- Check for Damage: Lift the tank lid and locate the flapper at the bottom. If it’s warped, cracked, or covered in debris, it won’t create a proper seal.
- Test the Seal: Push down on the flapper with a stick or your finger. If the running stops, the flapper isn’t sealing properly.
- Replace If Necessary: A replacement flapper is inexpensive—around $5 to $10—and easy to install. Look for a universal model or one designed specifically for your toilet.
2. Adjust the Chain
The chain connects the flapper to the flush handle. If it’s too short, the flapper may never close completely. If it’s too long, it can get tangled.
- Optimal Length: There should be just enough slack for the flapper to seal after flushing. Adjust the chain by hooking it onto a different link or using pliers to resize it.
3. Check the Water Level and Float
An incorrectly set float can cause the tank to overflow into the bowl.
- Adjust the Float: For older toilets with a float ball, gently bend the brass rod to lower or raise the float. Newer models often have a float cup that can be adjusted by turning the screw or sliding the clip on the fill valve.
- Watch the Water Line: There’s usually a water level indicator or “fill line” inside the tank. The float should be adjusted so the water fills to this line—not above it.
4. Inspect the Fill Valve
If water keeps running after adjusting the float and replacing the flapper, the fill valve may be faulty.
- Test the Valve: Shut off the water supply, flush the toilet, and remove the valve cap. Check for damage or blockages. If the valve is worn or leaking, it needs to be replaced.
- Replace the Valve: Purchase a replacement valve compatible with your toilet. Follow the instructions provided or consult a simple video guide.
5. Examine the Overflow Tube
If water is spilling into the overflow tube, the tank may be overfilling, or the tube’s height may need adjusting.
- Lower the Water Level: Adjust the float as mentioned above to keep the water level at least an inch below the top of the overflow tube.
- Replace the Tube if Cracked: If the overflow tube is damaged, you’ll need to replace the flush valve assembly, which includes a new tube.
Quick Tip: Unsure whether the flapper is leaking? Add a few drops of food coloring to the tank. If the color shows up in the bowl within 15 minutes without flushing, the flapper needs attention.
Fixing a running toilet is a quick, low-cost repair that can save you money on your water bill and prevent unnecessary stress. Plus, once you’ve handled this repair, you’ll feel equipped to tackle other minor home plumbing issues with confidence.
Temporary Fixes for Leaking Pipes
A leaking pipe can feel like an emergency waiting to spiral out of control, but it doesn’t have to ruin your day—or your home. While a permanent repair might require a professional touch, you can buy yourself some time with simple and effective temporary fixes. These quick solutions can prevent water damage, minimize disruption, and help you stay in control of the situation until more comprehensive repairs can be made.
How to Spot the Leak
Before attempting a repair, you first need to pinpoint exactly where the pipe is leaking. Here’s how to do it:
- Inspect visible pipes: Look for water dripping, puddles forming, or areas of condensation.
- Feel for wet areas: Use your hands to locate dampness if the leak isn’t immediately obvious.
- Trace water flow: Water often travels along pipes, so the actual leak may be slightly uphill of where you see water pooling.
- Turn off the water supply: If you find the leak, shut off the nearby valve or the main water supply to prevent further damage.
Being thorough with your inspection ensures you direct your repair efforts to the right spot.
Photo by Pixabay
1. Using Pipe Clamps for Quick Reinforcement
Pipe clamps are a strong and reliable way to temporarily manage larger leaks or cracks. These metal clamps use a rubber pad to create a watertight seal.
- How to Apply: Position the rubber patch over the leak, then tighten the clamp around the area using a screwdriver or wrench.
- Pro Tip: Keep clamps of various sizes (½”, ¾”, and 1″) on hand to handle different pipe types.
This is an ideal fix for pressurized water lines, as the clamp provides enough tension to withstand flowing water.
2. Wrapping Pipes with Waterproof Tape
Waterproof silicone or self-fusing pipe tape is a go-to fix, especially for small cracks or pinhole leaks. The tape stretches and adheres tightly, forming a seal even around irregular surfaces.
- Steps:
- Dry the area around the leak.
- Begin wrapping several inches below the leak, overlapping the tape as you go.
- Wrap upward past the leak, applying several overlapping layers for durability.
- Pro Tip: Silicone tape works especially well for high-pressure pipes or areas exposed to water consistently.
This method is great for homeowners who want a fast, fuss-free solution.
3. Applying Epoxy Putty for a Solid Seal
If you’re dealing with a cracked pipe or a joint that isn’t holding up, epoxy putty can be a lifesaver. This malleable adhesive hardens into a durable, waterproof seal when cured.
- Steps to Use:
- Turn off the water supply and wipe the area dry.
- Knead the putty in your hands until it becomes uniformly mixed (follow the instructions on the package for best results).
- Press the putty directly onto the leak and smooth it over the area.
- Let it cure for the recommended time (usually 10-60 minutes).
- Pro Tip: Epoxy is strong, but it’s designed for temporary repairs. Follow up with a professional fix.
This option works well on copper, PVC, or metal pipes.
4. Using Rubber Sheets and Hose Clamps
Rubber sheets paired with hose clamps make an effective bandage for larger ruptures. The rubber insulates the leak, while the clamps hold everything securely in place.
- How to Do It:
- Cut the rubber sheet to the appropriate size so that it covers the leak entirely.
- Wrap the rubber around the pipe and secure it with a hose clamp on either side of the leak.
- Tighten the clamps until no water seeps out.
This approach is especially handy for galvanized steel or cast iron pipes, which are more prone to corrosion and cracking.
5. Slip Couplings for Severe Breaks
For leaks where the pipe is significantly damaged or broken, slip couplings can help. These small fittings slide onto the pipe to bridge broken sections and restore flow temporarily.
- How to Use:
- Turn off the water and cut out the damaged section of the pipe using a tubing cutter or hacksaw.
- Deburr the edges of the pipe with sandpaper or a deburring tool.
- Slide the slip coupling into place, ensuring it fits snugly over the cut ends.
- Pro Tip: Some couplings are push-to-fit, making the job quicker and easier for beginners.
This simple hardware can spare you from a more extensive pipe replacement at the moment.
Essential Tips for Success
- Always keep the area dry before applying any repair materials, as moisture can reduce adhesion or seal strength.
- Monitor your temporary fix regularly and watch for signs of leaks reappearing.
- Use these fixes only as a stopgap; schedule a plumber to resolve the issue permanently.
With the right tools and techniques, stopping a leak in its tracks doesn’t have to be overwhelming. These temporary solutions are easy to execute and can prevent minor plumbing headaches from turning into major disasters.
Flushing and Maintaining a Water Heater
Keeping your water heater in top shape not only ensures reliable hot water but also avoids energy inefficiency and costly repairs. Two critical tasks—flushing the tank and replacing the anode rod—can prolong its lifespan and improve performance. Here’s how to handle these essential maintenance tasks.
Identifying Sediment Buildup
Over time, minerals and debris naturally settle at the bottom of your water heater tank. This buildup can reduce heating efficiency, cause unusual sounds, and even damage the tank. Wondering if sediment has accumulated in your unit? Here are some common warning signs:
- Rumbling or popping noises when the heater is running.
- Reduced supply of hot water or inconsistent water temperatures.
- Rusty or cloudy water coming from hot water taps.
- Increased energy bills, as the heater works harder than necessary.
Flushing the tank can fix these issues by dislodging and removing sediment. The process is simple and can be done annually—or every six months if you have hard water. Follow these steps:
- Turn Off the Power Supply
Switch off the circuit breaker for electric models or set your gas water heater to “pilot” mode. - Shut Off the Cold Water Supply
Locate the cold water inlet valve above the tank and turn it off to prevent water from flowing in. - Open a Hot Water Tap
Turn on the nearest hot water faucet to relieve pressure in the system and prevent vacuums. - Connect a Garden Hose
Attach a hose to the drain valve at the bottom of the tank. Lead the hose to a suitable drain location, such as a floor drain or outdoors. - Drain the Tank
Open the drain valve. Allow the water to flow out completely, along with any sediment. If the water appears dirty or cloudy, there’s significant buildup. - Flush with Fresh Water
Briefly reopen the cold water supply to stir up any remaining debris. Let it drain out until the water runs clear. - Close the Drain Valve
Once the water is clear, close the valve, remove the garden hose, and reopen the cold water supply. - Restart the Heater
Turn the power or gas supply back on and close the hot water faucet once steady water flow returns.
By flushing your water heater on a regular basis, you’ll remove sediment that could clog the tank or reduce efficiency.
Pro Tip: If you have a tankless water heater, the process is different. These units require a descaling solution like vinegar and a pump to flush mineral deposits from the internal components.
When to Replace the Anode Rod
An often-overlooked but critical component of your water heater is the anode rod. Positioned inside the tank, this metal rod attracts corrosive elements in the water, sparing the tank lining from rust. However, it doesn’t last forever.
How Do You Know It’s Time for a Replacement?
- The tank is older than 3-5 years and you’ve never replaced the rod.
- Water from the hot tap has a metallic smell or taste.
- Rust spots or discoloration appear on hot water fixtures.
- Regular visual inspections show the rod is more than 50% corroded.
To inspect or replace the anode rod, follow these steps:
- Turn off the Heater and Water Supply
Shut off the power or gas and close the cold water inlet valve. - Drain a Portion of the Tank
Attach a garden hose to the drain valve and release a few gallons of water to lower the water level below the anode rod port. - Locate the Anode Rod
It’s typically on the top of the tank, secured with a hex nut or fitting. - Remove the Old Rod
Use a socket wrench to unscrew the rod. This may require significant effort if it’s heavily corroded. - Inspect the Rod
If the metal core is exposed or the material is completely eroded, it’s time to replace it. Choose the correct type of rod—magnesium for soft water, aluminum for hard water. - Insert the New Rod
Wrap the threads in plumber’s tape, insert the rod into the tank, and tighten it firmly. - Refill and Restart the Heater
Restore the cold water supply, refill the tank, turn on the power or gas supply, and check for any leaks around the fitting.
Replacing an anode rod is a simple step that can potentially double your water heater’s lifespan. Ignoring it, on the other hand, can lead to tank corrosion and costly replacements.
Quick Reminder: Routine checks—every 1-3 years—ensure that the rod remains effective before it fully deteriorates.
With these two maintenance tasks—flushing out sediment and replacing the anode rod—you’ll not only keep your water heater running smoothly but also save money in the long run.
Conclusion
Knowing quick plumbing fixes empowers homeowners to save money, protect their property, and tackle unexpected issues with confidence. From handling a dripping faucet to dealing with stubborn clogs, having the right tools and basic knowledge makes a big difference. While these tips can address many common challenges, don’t hesitate to call a professional for more complex or persistent problems.
Taking the time to learn these essential skills is an investment in your home’s upkeep and your peace of mind. Which plumbing fix will you try next?